This post may contain affiliate links.
Making
Reverse osmosis is a process that can speed up syrup production by removing a significant amount of water from the sap before you put it in your evaporator.
This article goes over how to use reverse osmosis in a sugaring operation using a few different methods.
What is Reverse Osmosis?
Reverse Osmosis is a process typically used in water purification. According to Leader Evaporator, it is a process through which “a semi-permeable membrane is used to separate water from salt, sugar, minerals, and other impurities.” In other words, water is fed through a system that removes impurities and leaves you with pure H20.
When we’re making
Benefits of Reverse Osmosis in Sugaring
The whole point of boiling sap is to evaporate water and be left with a thick, sugary
In a backyard operation, most folks who want to make syrup will use a wood-fired evaporator like this one from the Vermont Evaporator Company. It works quite well, but we have found that we go through a ton of wood-processing
But if we could get some water out of the sap before it goes into the evaporator. Using a reverse osmosis machine, we can eliminate 50% of the water in our sap before boiling, thus greatly reducing the time it takes to go from sap to syrup. This means less time monitoring the evaporator and less wood needed to boil and make our syrup.

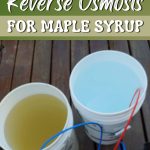
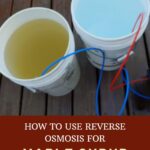
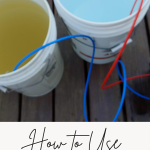
highly concentrated sap (left) and pure water (right).
Reverse Osmosis Options for Backyard Syrup Makers
Large maple producers pay thousands of dollars for high-quality reverse osmosis set-ups that work well for their size and scale. But spending that much money on your system doesn’t make sense if you are a hobby sugarer with less than 100 taps. Luckily, there are other options for obtaining a reserve osmosis set-up.
One option is to build your own reserves osmosis setup using filters like those used for water purification, available at many hardware stores. This guide from Souly Rested offers great guidance on how to build your system.
If making your own system feels too complicated or time-intensive, you can invest in a reverse osmosis system for backyard sugaring operations. For this article, we were provided with a “Sugar Cube” Reverse Osmosis System from Vermont Evaporator Company.
The Sugar Cube is an RO system built into a compact ammo box with handles so you can move it around as needed. It comes ready to use and needs a test run to check for loose fittings before hooking it up to your sap.
Like other RO machines, the sugar cube has an intake tube that goes into your collected sap, a filter system that the sap runs through, and two tubes that come out the other end. One of those tubes produced clean, clear water, and the other produced highly concentrated sap. Put them into two separate buckets, and voila, you can cut the water content of your sap by up to 50%.
Another unique benefit of the Sugar Cube is that it also adds an Ultraviolet (UV) filter to the system. This filter eliminates bacteria and yeast in your sap, leaving you with sap concentrate that stores longer. This is a handy benefit for hobby
You can put your sap through the RO system on Monday, Tuesday, or Wednesday and save it up for the weekend more easily and safely. If the weather is particularly warm, we can take this smaller sap and pop it in a cooler or the fridge so it doesn’t warm up too much.
A pre-made RO system like the Sugar Cube can cost up to $500, but if you are going to use it over many years, you’ll save that much in firewood and your time to make it worth it. Plus, you’ll have the peace of mind that your sap has been filtered in a food-safe way for longer storage.
Is a reverse osmosis system worth it for Hobby Syrup Makers?
We think a reverse osmosis system is a great investment for hobby syrup makers IF you are serious about making syrup more than once or twice a year. Since most backyard sugar makers use wood to boil their syrup, the savings on fuel by cutting your boiling time in half is huge. Cost-wise, the investment can pay for itself in just a few years with these savings.
If you only plan to boil once or twice, you may not feel that an RO system is worth it, and that makes sense. For you, it is more about the “experience” than the production. For us, producing enough syrup to last the full year plus more for gifts is part of our priority.
We don’t want that syrup to cost us more than if we bought it from another sugaring operation. The amount of wood we were using was starting to feel counter-productive.
Likewise, as much as we love sitting outside by the evaporator with friends, there comes the point where 18 hours of boiling each weekend can feel cumbersome; getting syrup faster is not a bad thing. It’ll impress your friends to sit there and watch the syrup come to fruition before their eyes.
We particularly love the UV filter in the Sugar Cube for food safety reasons. We don’t often have time to boil more than once a week. Knowing our sap has been filtered and is safe to use for longer helps us feel better about waiting until the weekend to boil. For that reason, it actually makes more sense for a backyard operation.
For more information on making syrup in your backyard, be sure to check out all of the articles in our series:
- How to Clean Maple Sap Buckets
- How to Tap a Maple Tree for Syrup
- How to Collect & Store Sap for Maple Syrup
- How to Boil Sap to Make Maple Syrup
- How to Boil Sap More Efficiently
Carrie Williams Howe is an educational leader by day and an aspiring homesteader by night and weekend. She lives on a small homestead in Vermont with her husband, two children, and a rambunctious border collie. She blogs about her family's homestead life at The Happy Hive.


This Is Very Good