This post may contain affiliate links.


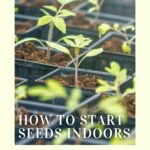
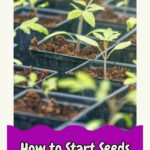
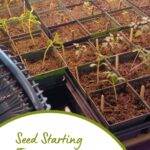

Starting seeds indoors is a fun way to expand your vegetable garden projects. With a little care and attention you can grow successful seedlings that will transfer into your garden and thrive. Seed starting is also fun because it allows you to dig into the soil and get your veggie garden started earlier!
Once you have all of your seed starting supplies, and you have decided what seeds you want to start inside, it’s time to plant your seeds.
In some ways, planting seeds is as easy as soil + water + light, but there are some tips and tricks of the trade that will help you to have even more success with seed starting. Here we share the process and the strategies that work best for us for indoor seed starting.

Step 1: Prepare your Soil
Success in seed starting begins with high-quality soil that encourages your seeds to germinate (start growing).
Good soil for seed starting isn’t too high in nutrients that could overwhelm your seedlings. It should absorb water well to keep the seed moist, but not become overly moist, making your pot a soggy spot ripe for mold to grow.

You can use a pre-made seed starting mix or make your own to start seeds indoors. Read more about these options in our article on seed starting supplies.
Either way, you’ll begin by putting a bunch of that seed starting mix into a large bucket. If you did follow a recipe that included it, you can add an all-purpose fertilizer. (If you are starting tomatoes, consider choosing a fertilizer that is specific to tomatoes.)
You can also consider adding compost to the soil, especially if you make your own compost at home. However, be sure to keep the soil light and moist and not make it overly dense by adding too much.
Add Warm Water to your Soil

Add warm water to the bucket with your soil and stir until thoroughly moist. You may find you have to add water in a few batches to ensure even moisture.
Don’t be afraid to dig in with gloved hands – sometimes, that is the easiest way to stir! Once you have a nice, warm, damp bucket of soil, you are ready for the next step.

Step 2: Spread Soil into Pots or Flats
Once your soil is ready to be used, you’ll spread it into your seed starting vessels (read more about options for pots and flats here).
Make sure that you spread the soil evenly into the corners. Typically, after the first round of soil you’ll need to gently tamp it down to fill in all of the space and then add a bit more on top. Do not press it so much that it overly compacts.

filled the whole cavity of the tray.
Step 3: Plant Your Seeds
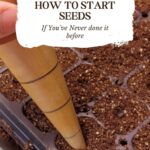
Now that your pot is ready, follow the directions on the seed packet to plant your seeds. Many seeds need to be planted about 1/4 to 1/2 inch into the soil.
A seed dibber is a cool tool for planting, as it has a rounded tip to push down into the soil and often measurements to help you decide how deep to go. But you can also estimate, and we find that a wooden dowel or the bottom of a Sharpie also gets the job done!
Once the seeds are in, cover them with another layer of soil or gently press the soil that you moved aside back over the seeds (note: this doesn’t need to be done for things like salad greens sprinkled on top).

Step 4: Mist the Soil and Cover with Plastic
Once you have planted and covered your seeds, use a spray bottle to gently mist the top with water, then cover your tray with a clear plastic cover or “humidity dome“ to create a greenhouse effect.
Plastic wrap can also work in a pinch! You’ll keep this plastic cover over the seeds until they germinate and grow taller. It helps to trap humidity and warmth the seedlings need to get a great start.

Step 5: Place on a Heat Mat and/or Under a Grow Light
Starting seeds indoors means you want to do your best to mimic the warmth of the sun. While some seedlings (like
A heat mat is a plastic mat, much like a large heating pad, that you place on your plant surface underneath your seed starting trays. They come in various sizes and shapes, and plug into a normal outlet.
A grow light can be as simple as a full-spectrum plant bulb or as complex as a multi-setting panel grows light. These provide an artificial source of light from above that helps to keep plants warm and provide full-spectrum light that encourages growth.
Check out our article on how to build a
Step 6: Water Seedlings Regularly
Now that your seeds are planted, you must keep their soil moist with regular watering. To do this, use a spray bottle at first until they have grown up and above the soil a bit. You can even spray the bottom of your plastic cover to create a humid environment.
After your seeds have germinated and are starting to grow, watering from the bottom is a great idea to encourage roots to grow downward. You can do this by gently flooding the tray that holds your pot or flat with water regularly.
Step 7: Strengthen your Plants
Once your plants have started to grow bigger (over an inch or two and starting to leaf out), consider adding a rotating fan to your seed-starting setup.
This will help strengthen the plants (mimicking an outside environment) so they grow thicker and not just taller in preparation for transferring them to your garden.

Other helpful articles
- Choosing which Vegetables to Start Indoors
- Seed Starting Supplies
- When to Plant Seeds Indoors (including a FREE Seed Starting Schedule)
- Preparing Seedlings for Transplanting
Carrie Williams Howe is an educational leader by day and an aspiring homesteader by night and weekend. She lives on a small homestead in Vermont with her husband, two children, and a rambunctious border collie. She blogs about her family's homestead life at The Happy Hive.


