This post may contain affiliate links.
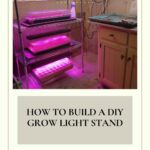
When it comes to seed starting, it is hard to find a better setup than a vertical, tiered seed starting shelf with grow lights on each level – commonly called a “grow light stand”.
This setup allows you to grow multiple levels of seedlings in a condensed space and provides appropriate levels of light and heat for each shelf. And making your own DIY Seed Starting Shelf system is totally within reach!
There are some beautiful store-bought options for
So, we wondered – could we make an equally effective DIY
We set out to create a seed starting shelf that was just as sturdy, with high quality lighting fixtures, room for as many seedlings as possible, and the added benefit of heat mats.

Supplies for DIY Seed Starting Shelf
- A 36-inch four-level shelf;
- 3 full-spectrum panel grow lights;
- 4 heat mats;
- a power strip;
- a timer;
- trays
We have added most of these supplies to a Seed Starting Shopping List on our Amazon Storefront so you can check them all at once and hopefully save yourself a few hours of research! With a bit more work, you may be able to find some of these things second-hand, which is also a great option.
Step 1: Find a Shelf for your Grow Light Stand
To begin with, we had to choose a shelving structure for our DIY
We wanted it to have at least three shelves, and we could use the top-level shelf as a bonus (with a light hanging from the ceiling) if we wanted.
This hunt was actually pretty easy, as shelving systems like this are available at many home improvement stores and on Amazon.
We chose a 36-inch Four-Shelf Chrome Unit from Amazon Basics. This system is adjustable and sturdy enough to hold plants without wobbling or feeling unstable. You can also choose a 48-inch shelf for more capacity and added cost.
PRICE FOR SHELF: APPROXIMATELY $50
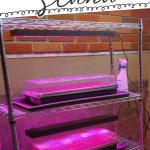
Step 2: Choose Grow Lights
Choosing grow lights for our home system was probably the most challenging decision. We wanted to save money, so we considered getting shop lights and replacing the bulbs with aquarium/plant bulbs. However, we didn’t feel like this mimicked the “real thing” closely enough, and our results using this approach had been mixed in the past.
Our frugal goals also meant that we didn’t want to spend $80-100 for each light. We needed to find something equally effective but not as pricey. We purchased three grow lights—one for each shelf (mimicking the store-bought version)—but we also had a
We looked at two different options for grow lights:
A Full Spectrum Panel Light resembles a big rectangular box with many circular lights. This light is rated highly by vegetable growers and supposedly performs better than T5 bulbs, though it’s unclear whether it performs significantly better than full-spectrum red/blue T5s.
This panel’s benefit is that it is 24 inches long and can cover a surface of up to 36 inches, which means it can cover the entire width of the shelf. It is also higher wattage than other lights. It was the more expensive of our two options, but we felt like we wanted to do this right the first time, so we went for it.
These lights turned out to be easy to adjust in terms of the height from the plant; you can use the metal strings that come with the light to hang it lower and closer to the plants, or you can use the clips that attach to those strings and clip them directly to the bookshelf to hang the light higher.


A Full Spectrum T5 Bulb Fixture with a Reflector looks more like your typical shop light. It has two long bulbs fitted into a metal fixture that comes down a bit on the front and back to help reflect more light toward the plants.
This fixture is 26 inches long, which means it would cover about 2/3 the width of our shelving system, which could work well as the light projects outward; it can also be adjusted easily height-wise.
If you are looking for a little bit of cost savings, this bulb is a bit less expensive than the panel. As an added bonus, you can turn one bulb on at a time, providing more flexibility in how you use them. If you choose a wider shelf, you can get a set of four 48-inch fixtures.
PRICE FOR LIGHTS: APPROXIMATELY $100 – 175
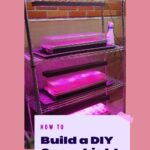
Step 3: Add Heat Mats
While most tiered seed-starting systems don’t come with heat mats, we find that using them with our seedlings greatly increases yield and performance. We wanted our system to have them from the start.
This step was a little bit harder because seed starting heat mats come in lengths that were either wider or narrower than the width of our shelving system.
We got the shorter length to move them around as needed and have them under trays that needed them but not under others. The shorter-length heat mats also mirror the size of most seed-starting trays (about 20 inches), and you can get them in 2-packs.
We chose to get four heat mats (two 2-packs) from BoHo Farm. These heat mats are waterproof and have nice long cords to reach a central power strip from any shelf (more on that later).
PRICE FOR HEAT MATS: APPROXIMATELY $50
Step 4: Add a Power Source
We needed 8 outlets to plug in 4 lights and 4 heat mats on our seed starting shelf. We had a combined power strip/timer/outlet, but you can also use two power strips that could be mounted to the end of the middle shelves to offer flexibility for lights above and below; the 2-pack of Surge-Protected Power Strips Amazon was a very affordable option.
You will then want to plug those power strips into a timer which would be plugged into the wall so that you can set your elements to turn on for a certain number of hours a day much like many store-bought tiered systems offer. We love our outdoor power strip with timer that we have used in the past for growing and holiday lights.
We did these two things separately because we knew we were going to have more than one shelf and needed flexibility, but if you are just building one shelf, you can actually get an 8
Outlet Power Strip with a Timer that would serve both functions.
PRICE FOR POWER STRIP & TIMER: $22-32
STEP 5: Consider Plant Trays (Optional)
Some store-bought tiered grow shelves have trays to put your plants in to catch water. For this part of the project, we recommend boot trays.
You can get a 2-pack of 30-Inch Boot Trays for much less than you would pay for fancy plant trays; order two of those, and you have a tray for each shelf (though it will be just a tad narrower than the full length of the shelf).
PRICE FOR TRAYS: About $40
STEP 6: Additional Assembly Parts
There are a few other things you might need to assemble your tiered seed starting stand, like chain link and S-hooks to make adjustable hangers for your grow lights (8 S-hooks, about 8 Feet of chain link) and screw-in hooks for your ceiling if you want to put a light above the shelf.
PRICE OF ASSEMBLY PARTS: About $20
Total Cost to Build 4-Tiered Grow Light Stand = $340 (find all of these supplies on our Amazon Shopping List)
If you have the time to research the parts you’d like to use, make the purchases, and build it yourself, you will save money by building your tiered seed starting to stand (almost 50% off the most comparable store-bought version).
We spent about 2 hours researching parts (but you don’t have to know that you’ve read this article!) and then about an hour or two building the actual shelving system.
Keep in mind that this $320 estimate can be lowered if you buy the less expensive lights, find items at re-use stores or through online neighborhood forums, or skip parts you don’t need (like boot trays). Likewise, the price can go up a little if you choose to upgrade to a 48-inch shelving system and buy the parts that will accommodate that larger size.
Also, remember that this is a step up from most store-bought systems that don’t come with heat mats. You can skip the heat mats if you don’t need them, though we highly recommend them.
We have loved having a space-saving high-capacity system like (or two) this for seed starting needs, and if you have a garden, we think you will, too. It will last you many years to come and ensure even higher success in your gardening endeavors!
Carrie Williams Howe is an educational leader by day and an aspiring homesteader by night and weekend. She lives on a small homestead in Vermont with her husband, two children, and a rambunctious border collie. She blogs about her family's homestead life at The Happy Hive.


