This post may contain affiliate links.


Constructing a covered raised bed in your garden offers several advantages. It is an effective barrier against various pests, including rabbits and leek moths, and can extend your growing season by providing shade. Additionally, it helps keep your garden bed organized, simplifying the preparation for spring.
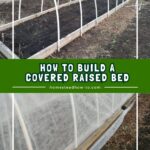
Over the past few years, we have been building 1-2 covered beds a year. We combine a simple raised bed frame design with a small tunnel setup. The equipment is simple, the cost is reasonable, and the rewards are many.
These covered beds have allowed us to plant salad greens and radishes earlier, protect our broccoli from cabbage moths, and shield our onions from leek moth attacks.
Covered raised beds are also ideal for initially acclimatizing seedlings moved from indoors, shielding them from cold nights or direct sunlight.
The materials for constructing these 16-foot raised beds with covers typically cost between $70 and $80. It takes about one hour to assemble a bed with simple tools.
Supplies
How to Build a Raised Bed
Step 1: Build the Bed
The simple setup for this bed entails connecting two 2x6x8s for each of the long sides of the bed, then cutting one of those 2x6x8s into 3-foot pieces for the end of the bed. We suggest outdoor wood screws for attachments. You can use a strip of scrap wood on each side to strengthen the connection in the middle and a chunk of wood in each corner to stabilize the corners.


Step 2: Install the Strap Clamps (optional)
This bed uses eight bent PVC pipes to support the cover. Thus, we space the strap clamps so that the first PVC pipe on each end is about one foot from the end of the bed, and the clamps are 2 feet apart. In other words, you’ll attach a strap clamp at 1 foot, 3 feet, 5 feet, etc. Each strap clamp is attached with two decking screws.
If you don’t want to use clamps, you can also bury the ends of your PVC pipe into the ground. This will be a little less stable but still workable.


Step 3: Insert the PVC Pipes
We’ve measured our beds to fit the 12-foot wide garden fabric, using the full length of the 10 ft. PVC pipe. If your garden fabric is not as wide, you may have to cut down the pipe for a smaller fit. Insert the pipe on one side of the bed, bend it, and insert it into the other.
It should be a fairly snug fit, and the ends should be pressed slightly into the soil so that the arch will not fall to one side (although sometimes the ones on the end will do that naturally, and it doesn’t affect the stability of the cover).

Step 4: Add the Row Cover and Anchor with your chosen material
Now, stretch the row cover over your bed and anchor it with whatever materials you’ve decided to use (in our case, 4×4’s).
You can also choose to dig one side of the cover into the dirt and anchor it down the other side, but this limits your access to one side of the bed and may make it hard to reach things on the permanently anchored side.

That’s it! Now plant your lovely veggies and enjoy the rewards!
We’d love to hear if you try this method and how it works. Good luck, and happy gardening.
Other Posts You Might Like
- How to Build a Bean Teepee
- How to Build a Log Cutting Rack
- How to Build a Top-Down Fire
- How to Build an Interior Storm Window
- How to Start Your Own Square Foot Garden and Reap the Benefits
Carrie Williams Howe is an educational leader by day and an aspiring homesteader by night and weekend. She lives on a small homestead in Vermont with her husband, two children, and a rambunctious border collie. She blogs about her family's homestead life at The Happy Hive.


Your pictures are nice. I guess when I hear “raised beds” I think of something 18 inches or more tall…..seeing your ‘raised’ bed only a few inches off the ground seems odd.
But your pictures say it all for directions…thank you for this post!
We think of anything where we add soil on top and create a frame around it as a “raised bed.” But yes, they really do range in size and height.