This post may contain affiliate links.
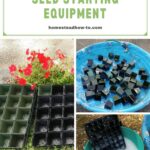
If you want to save money on gardening, reusing seed-starting equipment is a good way to go. Cleaning your seed trays and pots is quite simple. It is an excellent project for the last few weeks of warm summer weather.
Here’s a quick and easy way to clean your seed-starting equipment.
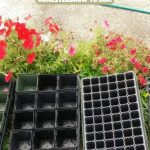
Step 1: Empty your pots and trays

Your first line of defense is removing any old soil or debris left in your pots. Shake it all out into a wheelbarrow or bucket and put it in your compost or a far corner of the garden where it will get a lot of sun.
This soil shouldn’t be used again for your seedlings, but heating it in your compost or the sunlight should remove the pathogens, so it doesn’t have to go in the trash.
Step 2: Rinse out the remaining soil and debris

Use a powerful hose setting to remove as much of the remaining soil and debris as you can. Then fill a baby pool or large container and toss the pots in there to give them a good rinse.
Step 3: Wash your pots and seed trays

Next, fill a large bucket or container with warm soapy water. Dip your pots and trays into the water one by one and shake them vigorously. Use your hands or a sponge to remove any stubborn debris. Then, plunge them into another bucket of plain water to wash off the soap suds.
Step 4: Disinfect your pots and trays

You should disinfect all of your pots and trays to ensure that the pathogens that cause damping out are gone. Many people recommend using a bleach solution, but I do not love using bleach on my homestead.
An alternative is to spray hydrogen peroxide on the pots and trays, let them dry, and then wipe them to remove any remaining layer.
Vinegar is another non-toxic option for killing mold and fungus. Again, you’ll want to wipe your pots after letting the vinegar sit for about 20 minutes.
However, if you clean your trays and seeds outside when the summer sun is still strong, you can also kill the most harmful pathogens by letting your trays dry out on a warm sunny day.
The UV Rays from a strong few hours of sunlight are one of the most natural ways to kill mold and mildew. Even if you use one of the methods above, adding exposure to sunlight to dry them out after the process can be a significant final step.
How you disinfect is really up to you, and it might depend on how certain you want to be that all of the pathogens have been banished from your equipment.
Step 5: Dry and store in a dry location
Lastly, ensure that you don’t foster more mold growth while you wait to plant your seeds in the spring. Fully dry your equipment in the sun or in a dry location inside before you stack it. Then, store it in a dry location where air can easily circulate.
Carrie Williams Howe is an educational leader by day and an aspiring homesteader by night and weekend. She lives on a small homestead in Vermont with her husband, two children, and a rambunctious border collie. She blogs about her family's homestead life at The Happy Hive.


 9")

