This post may contain affiliate links.


Potatoes have become one of the most rewarding harvests of our garden. Not only is the harvest abundant, but digging potatoes up is fun for the whole family!
There are many different methods for storing potatoes, including stacking them in a tower, using newspaper-lined laundry baskets, and burying them in the soil.
This article covers the method for storing potatoes in wood shavings. Before potatoes are stored for the long term, they need to be dried and cured. Follow the steps below to prepare and store your potatoes over the winter.

When are Potatoes Ready to Harvest?
If you are storing potatoes in your garden, ensure they are ready to harvest before bringing them in. Potatoes are ready to harvest when the vines have died, and the skin is firmly attached. Dig out a hill or two to test your potatoes and rub your hands over the skin.
The potatoes are not yet ready to harvest if the skin rubs off easily. If it stays firmly attached and does not rub off under your fingers, you can dig your potatoes up and take the following steps to store them effectively.
Step 1: Dry the Potatoes
After harvesting potatoes, leave them in a well-ventilated spot out of the sun to dry out. One option is to leave them in the garden on top of the soil, covered to avoid direct sunlight.
You could also put them in a shady spot outside or inside your house. The most important thing to remember during this time is that potatoes must stay out of the sunlight. Potatoes exposed to sunlight tend to get green skin, which can be slightly toxic when eaten. To learn more about this occurrence, check out the article on the National Gardening Association’s Learning Library.
Your potatoes should be dry after just a day or two.
Step 2: Brush off Soil and Sort for Damaged Potatoes
After the potatoes have dried, brush off as much dirt as possible. Not only does this save time when washing before using the potato, but it enables you to see any imperfections the potato may have.
I noticed the first time I harvested potatoes that I had gouged a couple with the tines of my pitchfork. These potatoes needed to be eaten sooner rather than later. It also allows you to see if there is any damage from pests–I lost a couple from worms this year. Save the potatoes in the best storage shape, and set aside any damaged potatoes to use as soon as possible.

My chosen brush is a soft brush from my horseback riding days. Using something that won’t scratch the potato’s skin is important. You can try an old rag, too. Just be sure you don’t wash the potato before storage–it’s hard to get them dry afterward, and it lowers the quality of the potato.

Step 3: Cure the Potatoes
Curing your potatoes allows the skin to toughen up and prepares them for longer storage. The curing period should be anywhere from 7-14 days. You want a cool, dark place to cure your potatoes without sunlight shining.
The ideal air temperature is 45-60 degrees, and if you’re looking for a high-humidity place, aim for 85-95% humidity. Airflow is another factor you want to consider–the skin of the potatoes needs to breathe to cure fully. In many cases, a basement or garage can be a great option for curing potatoes.

If you don’t have the option of slotted shelving or something conducive to airflow, rotate the potatoes every couple of days throughout the curing process to ensure the entire skin is exposed to air. I drape a thin sheet over the edge of the shelf to block out as much light as possible.
Step 4: Store Potatoes in Shavings
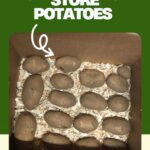
Once your potatoes have fully cured, it’s time to pack them up for storage! Here, we store potatoes in pine shavings in a box.
You can also use a plastic storage bin, but make sure that you poke holes for ventilation in either case. A root storage bin is also a good option – often, they are lined with burlap, which helps keep light out but allows air circulation.
Start by putting a thin layer of shavings down on the bottom layer of your box.

Next, layer the potatoes in–make sure to leave a little space between each potato for airflow! Put another thin layer of shavings, then more potatoes, repeating the process until the box is full. Set them in a cool, dark spot for winter storage!
The ideal temperature for storing potatoes is between 40-50* Fahrenheit–any cooler, and you risk the potatoes freezing; any warmer and the potatoes could start sprouting quicker! The location should also not be too moist, or the potatoes will start to go bad. Luckily, storing the potatoes in shavings helps to absorb moisture and prevent them from getting too wet.
Cover your box or bin with a regular cover, newspaper, or sheet, but make sure that there is still air circulation by poking holes in the side or top of the storage box.
Be mindful to check on your potatoes throughout their storage life. Any that are sprouting or starting to get squishy need to be removed immediately.

Where to Store Potatoes
A basement or garage is usually a good storage location for potatoes, but ensure the area is not too moist. They will not keep as long in a refrigerator because the added moisture will develop sugars that cause them to darken when cooked.
To read about other methods for storing your potato harvest, visit these articles by University of Idaho Extension and Barbara Pleasant. Both outline different options.
For more info on storing veggies, check out these great articles!
- How to Harvest, Cure, & Store Garlic
- How to Store Carrots
- How to Harvest, Cure, & Store Onions
- How to Store Pumpkins
Carrie Williams Howe is an educational leader by day and an aspiring homesteader by night and weekend. She lives on a small homestead in Vermont with her husband, two children, and a rambunctious border collie. She blogs about her family's homestead life at The Happy Hive.


Great article! I just have mine stored in boxes right now. I think I’ll pull them out and layer them in shavings though!
Hope that works for you, Lacey!
I want to use milk crates to store my spuds. How do I keep the pine shavings from falling out the sides without cutting off the air circulation?
Given that you can store potatoes in an enclosed container, then putting a piece of cardboard or something like that to line the milk crate would keep the shavings from spilling out the sides much like a box, right?
Thank you for your reply. I decided to use gunnysack material in between layers and side.