This post may contain affiliate links.
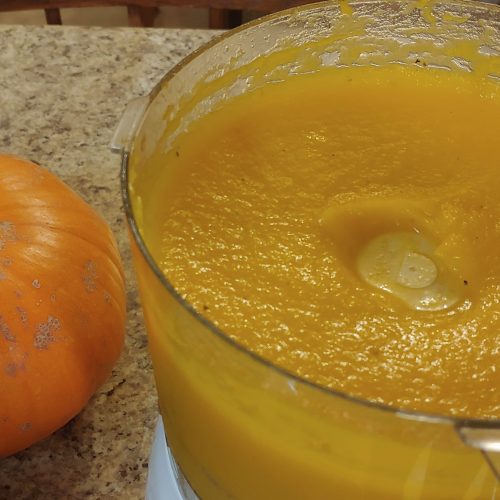
Homemade pumpkin puree is much better than the canned stuff you buy at the store. The flavor of homemade puree is much richer, and the texture is worthy.
If you grow your pumpkins, you can make various purees. While pie pumpkins will make a traditional orange puree, lighter pumpkins like Long Island Cheese will make a golden puree that makes a lovely soup. This same method can be used to make butternut squash puree, too.
Pumpkin puree can make pies, soups, bread, muffins, and even pancakes! Making your pumpkin puree will add depth of flavor to those treats.
Let’s get into how easy it is to make pumpkin puree with these simple steps.
Step-by-Step Guide to Homemade Pumpkin Puree
Equipment
- Baking sheet
- Large chef’s knife
- Food Processor – You can use a food processor or a high-quality blender to puree your pumpkin. Depending on how many pumpkins you roast, you may need to do it in batches, being careful that the hot puree does not splatter on you.
Ingredients
- 1-2 Pumpkins
- 1 tbsp Extra Virgin Olive Oil
- 1 tsp salt
- 1 tsp freshly ground pepper
Instructions
- Preheat oven to 400 degrees.
- Rinse and dry your pumpkins to remove any dirt.
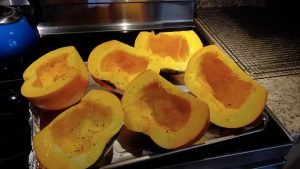
- Chop the pumpkins into large chunks (in half or quarters, depending on the size of your pumpkin), removing the stem. Scoop out seeds and stringy inner flesh.
- Place pumpkins face up on baking sheet and drizzle with olive oil, then sprinkle with salt and pepper.
- Turn pumpkin pieces over so that they are flesh down.
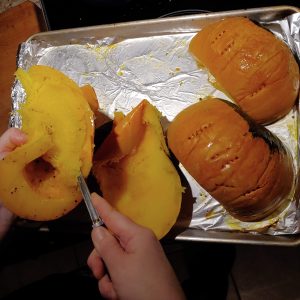
- Place the baking sheet with pumpkins in the oven and bake for 30-45 minutes. Check for doneness at 30 minutes. The pumpkin skin should easily be pierced with a fork when done.
- Remove pumpkin from the oven when done and allow to cool slightly.
- Use a large spoon to scoop the flesh out of the pumpkin skin.
- Place into a food processor or high-quality blender. Blend to your desired consistency. If you want to eat the pumpkin as is, you may want to leave some texture to it, but if you want to use it for soups or pies, you should puree until it is quite smooth.
- Use immediately or store in the refrigerator for up to a week. Pureed pumpkin can be stored in the freezer for 3-6 months.
Can you Freeze Pumpkin Puree?
Homemade pumpkin puree is a great candidate for the freezer. In fact, come late winter, when the pumpkins we have stored in our garden start to get soft, we turn most of them into puree and stick them in the freezer.
A recycled yogurt container makes a great storage option. Fill the puree about one inch from the top – enough room for expansion but not enough for the freezer burn.
Pumpkin puree will be kept in the freezer for at least three months, but we have been known to use puree that has been there for 6-8 months with no problem.
How to Use Pumpkin Puree
Homemade pumpkin puree is great for any recipe that calls for its canned equivalent. And you can make so much more than pie!
If you are making baked goods, defrost the puree if stored in your freezer. You can throw the whole frozen chunk in your pot and let it cook for soups.
Here are a few of our favorite recipes that use pumpkin puree:
- Pumpkin Pie (had to start with the classic!)
- Pumpkin Cream Cheese Brownies (deliciously decadent)
- Pumpkin Ice Cream (cause ice cream always makes the list)
- Roasted Pumpkin Soup (so heartwarming in the fall & winter)
- Pumpkin Bread (a moist, satisfying loaf)
Homemade Pumpkin Puree
Equipment
- Baking sheet
- Large chef's knife
- Food Processor You can use a food processor or a high-quality blender to puree your pumpkin.
Ingredients
- 1-2 Pumpkins
- 1 tbsp Extra Virgin Olive Oil
- 1 tsp salt
- 1 tsp freshly ground pepper
Instructions
- Preheat oven to 400 degrees.
- Rinse and dry your pumpkins to remove any dirt.
- Chop the pumpkins into large chunks (in half or quarters depending on the size of your pumpkin), removing the stem. Scoop out seeds and stringy inner flesh.
- Place pumpkins face up on baking sheet and drizzle with olive oil, then sprinkle with salt and pepper
- Turn pumpkin pieces over so that they are flesh down.
- Place baking sheet with pumpkins in the oven and bake for 30-45 minutes. Check for doneness at 30 minutes. The pumpkin skin should easily pierce with a fork when done.
- Remove pumpkin from the oven when done and allow to cool slightly.
- Use a large spoon to scoop the flesh out of the pumpkin skin.
- Place into a food processor or high-quality blender. Blend to your desired consistency. If you want to eat the pumpkin as is, you may want to leave some texture to it, but if you want to use it for soups or pies, you should puree until it is quite smooth.
- Use immediately or store in the refrigerator for up to a week. Pureed pumpkin can be stored in the freezer for 3-6 months.

Carrie Williams Howe is an educational leader by day and an aspiring homesteader by night and weekend. She lives on a small homestead in Vermont with her husband, two children, and a rambunctious border collie. She blogs about her family's homestead life at The Happy Hive.

