This post may contain affiliate links.
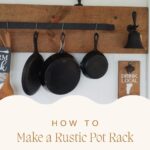
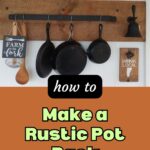
When we did a little amateur remodeling in our porch this summer, I looked at my cast iron pans that needed to be stored in there and had a vision for a pot rack that would echo the qualities of that pan – rustic, practical, simple, strong, and beautiful (in my humble opinion). I love the pot rack design we came up with, and I think it could work in any homestead kitchen, pantry, or storage area. You could even use this design for hanging things in your workshop.
This pot rack is designed to stretch along a wall, with pots hung next to each other. It takes up a bit more space horizontally than a three-dimensional pot rack that might hang above a counter, but the benefit is that the pots all lie flat along the wall. In that sense, it is less obtrusive. If you don’t have space for a pot rack in the middle of your room, this is a nice option that adds character without taking up too much space.
Preparation
Before you go out to buy or otherwise obtain your materials, you’ll need to decide what you want to hang on your pot rack and take some measurements. Lay your pots and pans out on the floor in a line and see how much space it would take to hang them all horizontally next to each other. Determine the length of your board by measuring the distance across the tops of your pots and pans, with space at either end.
Of course, you also need to consider the space you have for hanging. How much can you fit? We had a full-length wall to work with so we gave our pots and pans plenty of space and decided to stretch the pot rack across the whole wall because we liked how it added to our space. You could just as easily build a pot rack that is 3 feet long and holds 5 pots.
The height of your board is really about preference. It should probably be at least 6 inches tall in order to ensure that it can be hung and have hooks installed without splitting. We chose to use a full barn board (12 inches) because we felt it also kept the pots away from scratching the wall, and we liked the look of it.
Laying your pots out also helps you to determine how many hooks or nails you’ll want for hanging them. Determine your spacing (we wanted uniform spacing but you could also put some of them closer together), and count how many hooks you can fit.


Materials
- A reclaimed barn board or a rough-cut board in the length and height that you desire. We got ours from a friend who had removed it from his barn. You can often find lumber like this at a building supply recycling store, or you can ask for rough cut at a lumber lard.
- Bolts and washers for hanging the board. You’ll want strong, heavy bolts that will go at least a few inches into the wall, with washers to put between them and your wood. A good estimate for how many you’ll need is to divide the length of your board by 16 (the number of inches between studs). You’ll want one bolt in each stud. Buy a few extras, just in case! Your local hardware store is a great place to get advice on which kind of bolts will best fit your project (yes, Ace really is the friendly place where we live).
- (optional) Black paint with either a shiny or matte finish to paint your bolts and washers; spray paint can work well for this purpose. This is a great look for matching to your cast iron or other rustic pots and pans! But, if your pots and pans are stainless, you may want to stick with the silver color of your hardware.
- Hooks to hang your pots. There is flexibility when choosing hooks. You can go with a traditional “cup holder” style hook, hooks you find at an antique store, or any variety of options. We actually chose to use antique style “cut nails” like the kind you would use to install real wood flooring. These added to the rustic look. Another option is to actually install a pot rack that is designed to be flush against the wall on your wood base that can serve as a flexible pot rack – we did this on half of ours, with a cast iron flat bar we had purchased years ago and never installed!
- Wood Stain – if you want to alter the color of your base wood, you can do so with a quick coat of stain.
Tools
- Measuring Tape
- Wood Marking Pencil
- Level
- Stud Finder (or another method for finding the studs in your wall)
- Paint Brushes (if you are painting your wood and/or bolts)
- Drill – with a bit one size smaller than your bolts and a head to fit over your bolts; also a bit one size smaller than your hook hardware.
- Wrench – to finish bolts for the last few turns
Installation
Step One: Spray paint your bolts and washers and allow to dry according to paint directions.
Step Two: Stain your Board and allow to dry according to directions on the can.
Step Three: Install the Board on the wall.
Find the studs in your wall (here are some hints on how to find studs!) and determine where they will fall behind your board. Measure and mark bolt placement (lined up with studs) on your board before putting it up on the wall. Place the board on the wall, level, and hold in place. For each bolt, pre-drill a hole one size smaller than the bolt then install the bolt using the drill up until the last few turns; then use the wrench to finish so that you don’t push too hard into your base wood.

Step Four: Install your hooks.
We preferred to install the hooks after the board was mounted as this made the board easier to work with when mounting. You can install first if you prefer. Remember to pre-drill holes before putting in your hooks if they are screw-in hooks. For our cut nails, we pre-drilled a hold at a downward angle, and then hammered the nails in about half way, being careful not to split the wood.
Step Five: Touch up paint as necessary (if it was nicked when installing the screws, for example) then hang your pots and enjoy!
If you make one of these pot racks we’d love to see your final product. Send us a photo or post about your project in the comments below!
Carrie Williams Howe is an educational leader by day and an aspiring homesteader by night and weekend. She lives on a small homestead in Vermont with her husband, two children, and a rambunctious border collie. She blogs about her family's homestead life at The Happy Hive.


 8")

