This post may contain affiliate links.


Over the years, there has been a resurgence in the popularity of natural remedies, with many individuals favoring them over-prescribed medications. The enduring appeal of these remedies lies in their time-tested efficacy and the use of easily accessible, all-natural ingredients, fostering a connection to the earth.
One noteworthy natural remedy is Fire Cider, often referred to as Fire Water. The name might sound intimidating, but it stands out as one of the most effective natural remedies.
Packed with potent flavors from ingredients like horseradish, ginger, onions,
What sets Fire Cider apart is not only its effectiveness but also its simplicity in preparation, using ingredients readily available at your local grocery store.

**Disclaimer: I am not a doctor or medical professional and Homestead How-To is not affiliated with any medical professionals. All opinions and advice in this article are from my personal experience. Please see the disclaimer policy.
What is Fire Cider?
A beloved choice within the herbal and homesteading communities, Fire Water stands as a do-it-yourself herbal tonic celebrated for addressing various issues such as colds, flu, congestion, digestion, headaches, and immune support. Its potent blend includes apple cider vinegar, horseradish, ginger, onions,
This tonic’s key ingredients serve specific purposes – apple cider vinegar aids digestion, horseradish tackles sinus congestion and headaches, and
The preparation involves allowing the concoction to sit in a
Whether taken daily or at the first sign of a cold, a spoonful of Fire Cider can be a flavorful and beneficial addition to your wellness routine.
What You’ll Need

Ingredients for Fire Cider Recipe
Supplies & Tools
Step 1: Chop Ingredients
Add the peeled onion (halved),
Dice the lemon, lime, and orange into smaller pieces. No need to fret about the rind; leave it as is!
While manually chopping the ingredients with a knife is an option, utilizing a food processor significantly speeds up the process.

Step 2: Fill the Mason Jar
Place the diced ingredients into the
The goal is for all of the ingredients to be submerged in the vinegar.

Step 3: Shake the Mason Jar
Once they are all submerged, screw on your
Step 4: Wait
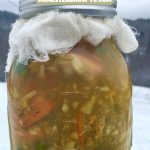
Allow the fire cider to rest in a dark and cool space for four weeks to reach its optimal readiness. Give it a gentle swirl every few days, being cautious to avoid any spills.
Step 5: Strain
After four weeks, strain the liquid using a fine mesh strainer into a fresh
The quantity of
Step 6: Store
Store it in the same dark spot as you brewed it. Ensure it remains sealed and placed in a dark environment, and it should maintain its quality for several months.


 7")


