This post may contain affiliate links.


Apples are a regular in our household. From
But what I appreciate most about apples is their versatility – from creating apple sauce and apple pie to extending their shelf life by drying them.
Dried apple slices can be used in various ways, from snacking on apple chips to garnishing dishes. They offer a different way to enjoy and utilize apples.
Here’s a simple guide on how to dry apple slices at home.

Ingredients for Dehydrated Apples
- Apples
- Lemon
- Water
- Air Fryer or Oven
- Parchment Paper
- Wire Cooling Rack
- Cutting Board
- Knife
- Optional: Apple corer
Drying Apple Slices in an Air Fryer
- Start by slicing your apples into thin pieces using a sharp knife. You can slice them in a round shape or slice them in halves. It is really up to you. Try to remove the core of the apple and any seeds. I left the core because I like the look and taste of it.

- Combine lemon and water in a bowl, and place the apple slices in the lemon water to soak for 15-20 minutes.
- Once soaking is complete, lightly pat dry the apple peels with a clean towel or paper towel to help remove some of the juice. Doing this will help prevent your apple slices from turning brown.
- Line the base of the air fryer with parchment paper.
- Arrange the apple slices on top of parchment paper, making sure they’re spread out evenly and not overlapping. It’s important to give them space to allow for proper airflow.

- Set your air fryer to 180°F and let the apple slices cook for about an hour and a half. Remember to flip them over every 30 minutes to ensure even drying.
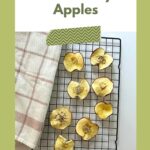
- Once done, transfer the apple slices to a wire cooling rack or a baking tray to cool completely. Let them cool for about 10-15 minutes. Once they are cool, they will feel hard, firm, and no longer sticky.
And there you have it! Your apple slices are ready to be enjoyed in your favorite recipes or as tasty apple chips.


How to Dehydrate Apple Slices in an Oven
- Spread your apple slices out on a baking sheet lined with parchment paper.
- Heat the oven to 170 F and then bake the apple slices for three hours until they’re completely dry.
- Flip the apple slices every half hour to allow an even distribution of heat and avoid excessive curling of the edges.
What Are Dehydrated Apple Slices Good For?
There are a number of things you can do with dried apple slices, and one of the main ways is to make it an apple chip snack. However, here are a few other ways you can use it:
- Use it as garnish on your favorite cocktail, apple cider or nonalcoholic drink.
- They make a delicious and healthy snack that the entire family will enjoy.
- Dried apple slices can be chopped up and added to baked goods like muffins, cakes, cookies, and bread for added sweetness and texture.
- Mix the apples with nuts, other dried fruits, and chocolate for a tasty trail mix that’s perfect for hikes or snacking on the go.
- Sprinkle dried apple slices over your morning cereal or overnight oatmeal for added flavor and texture.
- They can add a sweet and chewy element to salads.
- Incorporate them into homemade granola mixes for added sweetness and chewiness.
- Add dried apple slices to yogurt for a sweet and crunchy topping.
Other Recipes You Might Like
- How to Make Dried Orange Slices
- How to Dry Rosemary – 4 Easy Methods
- How to Dry Black Currants in a Dehydrator
- How to Choose a Food Dehydrator
- How to Dry Fresh Herbs
How to Store Dehydrated Apples
When storing, put the dried apple slices in a sealed container or zip-lock bag. Keep them in the fridge or a cool, dark spot in your pantry to keep them fresh and colorful for longer.
How long will dry apple slices last?
To ensure your apple slices have a long shelf life, it’s crucial to remove all moisture and thoroughly dry them. Dried apple slices can last for years, especially if you use them for decoration. But if you plan to use it in recipes or as a garnish, it’s best to use it within a year for the best taste.
How long does it take to dehydrate an apple slice?
Typically, drying apple slices in the air fryer takes around an hour and a half. However, if you cut your slices on the thicker side, they might require a bit more time to fully dehydrate.
How do you prevent the apple from turning brown?
The best way to prevent the apple from turning brown is by pretreating it by soaking it in water and lemon juice.
Do you peel the apples before dehydrating?
No, there is no need to peel your apples before dehydrating. All you have to do is wash your apples and then thinly slice them to prepare them for the air fryer.
How to Dry Apples

Equipment
- Air fryer or Oven
- Wire cooling rack
- Cutting Board
- Knife
- Apple corer (optional)
Ingredients
- Apples
- Lemon
- Water
Instructions
- Start by slicing your apples into thin pieces using a sharp knife. You can slice them in a round shape or slice them in halves. It is really up to you. Try to remove the core of the apple and any seeds. I left the core because I like the look and taste of it.
- Combine lemon and water in a bowl, and place the apple slices in the lemon water to soak for 15-20 minutes.
- Once soaking is complete, lightly pat dry the apple peels with a clean towel or paper towel to help remove some of the juice. Doing this will help prevent your apple slices from turning brown.
- Line the base of the air fryer with parchment paper.
- Arrange the apple slices on top of parchment paper, making sure they’re spread out evenly and not overlapping. It’s important to give them space to allow for proper airflow.
- Set your air fryer to 180°F and let the apple slices cook for about an hour and a half. Remember to flip them over every 30 minutes to ensure even drying.
- Once done, transfer the apple slices to a wire cooling rack or a baking tray to cool completely. Let them cool for about 10-15 minutes. Once they are cool, they will feel hard, firm, and no longer sticky.


