This post may contain affiliate links.
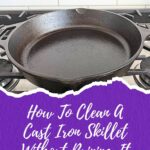
I’ve always loved cooking with a Cast iron grill pan—there’s just something about the way it evenly distributes heat and develops a natural non-stick surface over time. It’s one of the most durable and reliable pieces of cookware you can own, capable of lasting for generations when properly cared for. But despite its toughness, cast iron does require some maintenance, and one of the biggest challenges is dealing with rust.
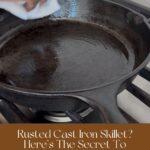
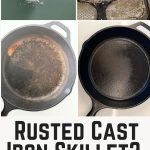
Rust can creep up surprisingly fast, especially if a pan isn’t dried thoroughly or has been stored in a humid environment. If you’ve ever neglected your cast-iron grill skillet or picked up a secondhand cast-iron pan from a thrift store, flea market, or garage sale, chances are you’ve encountered a bit of rust. While it may look unsalvageable, don’t be too quick to toss it out—restoring a rusty cast iron pan is easier than you might think.
With the right technique, you can revive your
Why Does Rust Form on Cast Iron Grill Pans?

Before starting the restoration process, it’s helpful to understand what causes rust. Cast iron, while incredibly durable, is highly susceptible to oxidation when exposed to moisture for extended periods. Even the most well-seasoned pan isn’t immune to rust if it’s not cared for properly.
Rust can develop for a variety of reasons, including improper storage, neglect, or even everyday kitchen habits. For example, leaving a cast iron pan in the sink, running it through the dishwasher, or letting it air dry can all lead to rust forming on the surface.
Since cast iron doesn’t have the protective coating found in other cookware, it requires a little extra attention to keep it in top condition. But don’t worry—if rust has already set in, there’s an easy way to bring your pan back to life.
Step-by-Step Video: How to Restore a Rusted Cast Iron Skillet
Supplies Needed to Remove Rust

- Cast-iron grill pan or skillet
- Hydrogen peroxide
- Baking soda
- White vinegar
- Steel wool pad or Scouring pad
- Liquid dish soap
- Paper towel or clean dishcloth
- Cooking oil (canola oil, vegetable oil, or
avocado oil will do)
Step 1: Create a Cleaning Paste & Scrub Away Rust

Start by mixing a rust-fighting cleaning solution using 1 cup of Baking soda and ½ cup of Hydrogen peroxide. This combination works as a gentle abrasive that lifts rust while breaking down tough grime.
Dip a scrub brush, Scouring pad, or a stiff sponge into the paste and start scrubbing the
Step 2: Neutralize with Vinegar

Once you’ve scrubbed off most of the rust, pour White vinegar over the
Step 3: Rinse and Wash

Thoroughly rinse the
Step 4: Dry Thoroughly

Using a paper towel or clean dishcloth, wipe the
Step 5: Apply a Thin Layer of Oil

Now it’s time to season the
Pour a small amount of oil into the
Step 6: Bake and Season the Skillet

Place the
Let the
Once time is up, turn off the oven and allow the
When the

What does it mean to “Season” Cast Iron?

Seasoning cast iron means adding a layer of high-quality oil to the surface and baking it. This process adds a nice dark and shiny “patina” to the surface of the cast iron pan.
A well-seasoned pan will resist rust better and last for years. Seasoning your cast iron pan also leads to a virtually (though not always) non-stick surface. You will still need to use a lubricant like butter or oil when cooking, but even a fried egg can slide right off a well-seasoned pan.
The more you cook with your pan with high-quality oils, the more you’ll build up this layer. Taking the time to season your pan when you first get it and regularly thereafter will ensure a nice, smooth seasoning.


